Super-Shiny
Super Member
     SUSPENDED
Joined:January 2013
Posts: 13,131 
Location:
Likes: 10,308
Recent Posts
Last Online Nov 25, 2014 19:31:22 GMT
|
Post by Super-Shiny on Aug 4, 2013 19:17:21 GMT
Loving it Greigster that piccy clears a lot of things up for me  I will be trying all methods but this one seems like my firm favorite for easiness  |
|
Greigster
Mod Maker
Provari Pimper
Joined:November 2012
Posts: 4,311 
Location:
Likes: 3,225
Recent Posts
Last Online Jul 11, 2024 8:49:03 GMT
|
Post by Greigster on Aug 4, 2013 19:29:33 GMT
Super-ShinyI have tried the 6x1mm, 3x2mm. 2x3mm, figure of 8, all loose ends but got dry hits with all of them........some more than others but I have not had a single dry hit with the 1x3mm. As has been said above, it is whatever works for you. The fun is trying and finding, hence I am going to strip this perfectly working coil/wick setup just to have another play with Microcoils and cotton wool..........until the next thing 
|
|
Super-Shiny
Super Member
     SUSPENDED
Joined:January 2013
Posts: 13,131 
Location:
Likes: 10,308
Recent Posts
Last Online Nov 25, 2014 19:31:22 GMT
|
Post by Super-Shiny on Aug 4, 2013 19:40:07 GMT
Think i will try yours first as i like out of the box and simple thinking Greigster and the best part is i have loads of 3mm Ekowool in my overstock of gear that i don't use  |
|
blakey
Super Member
     Ninja Maestro
Joined:June 2011
Posts: 9,206 
Location:
Likes: 4,242
Recent Posts
Last Online Nov 22, 2024 19:52:52 GMT
|
Post by blakey on Aug 5, 2013 13:22:21 GMT
Give this a go Some 1.5mm silica, a pin and some .2mm kanthal The Kayfun base has its terminal screws loosened and ready to trap the wire 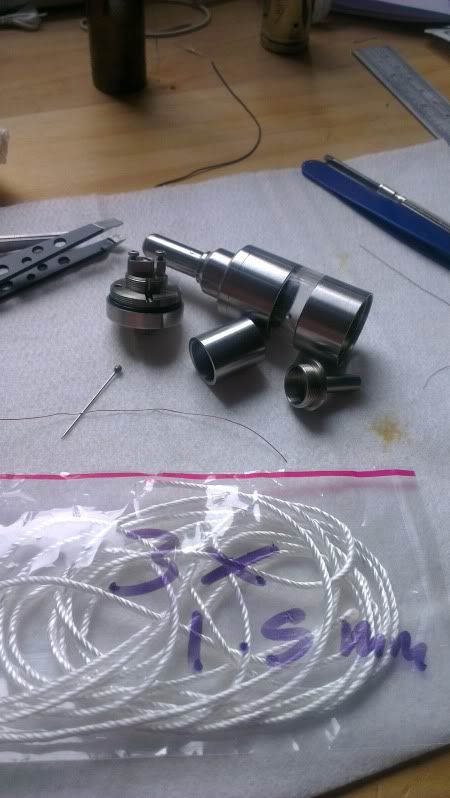 Wrap the wick twice round your finger like this 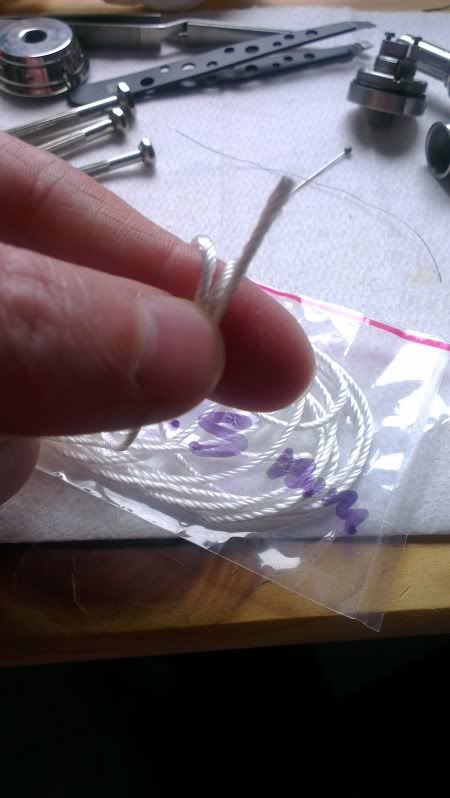 Place a pin underneath like this to act as a splint 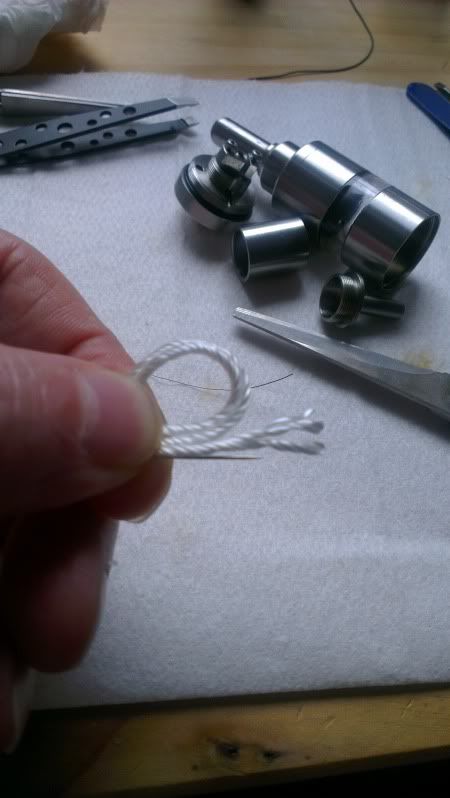 Now pass your wire through the loops and trap with your thumb like this 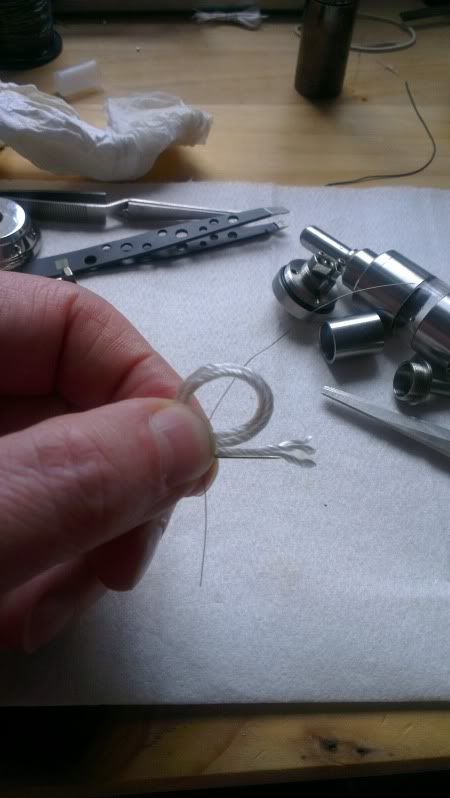 Then just thread your wire through like this and wrap your coil 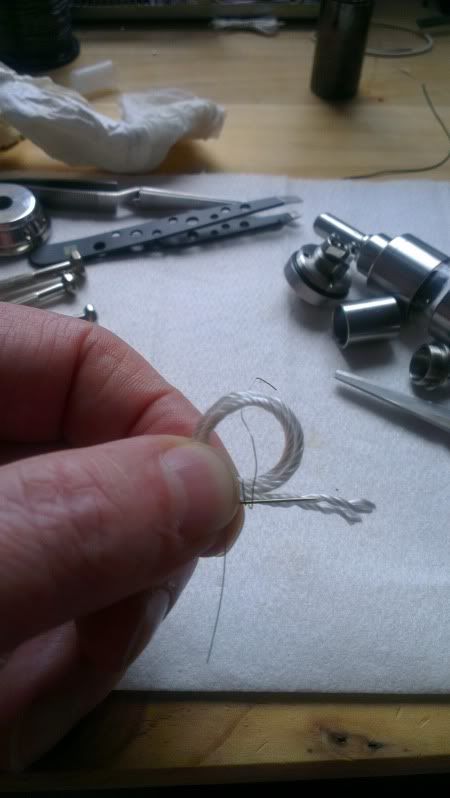 You should end up with this 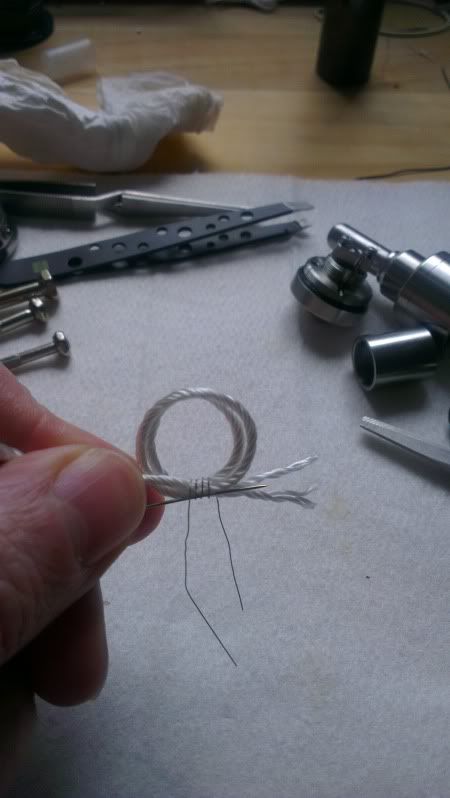 Bend the two wire ends UNDER the coil to get this 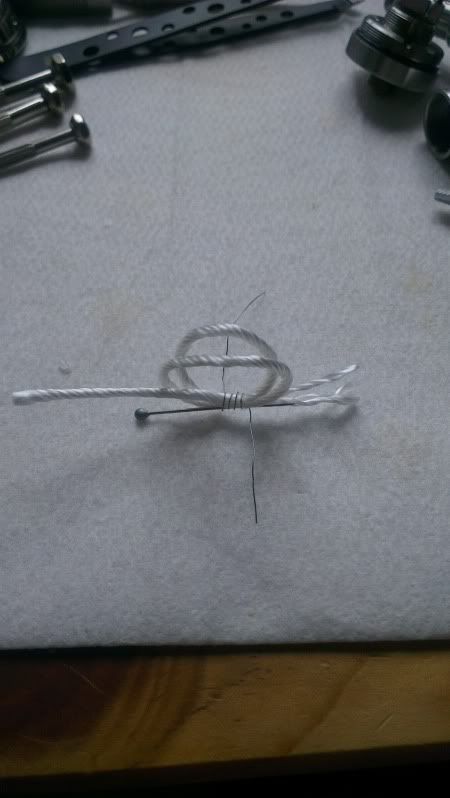 Now sit your assembly onto the kayfun diagonally between the terminals and trap the wires under the screws 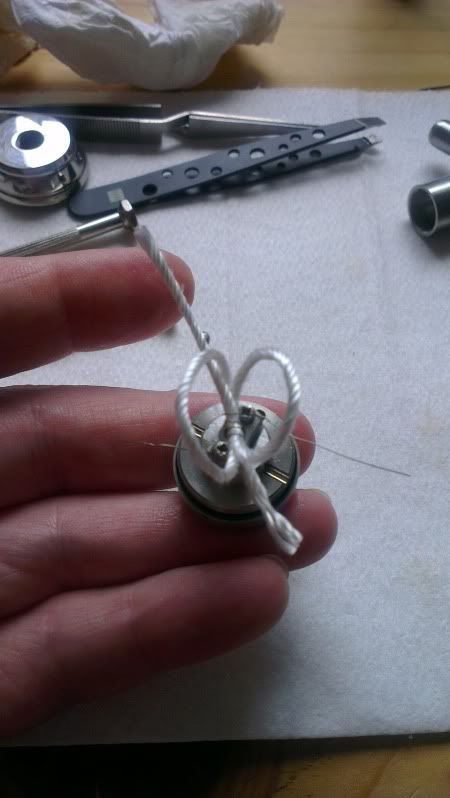 Remove the pin you used as a splint and then pull each end of the wick to reduce the loop size to something like this 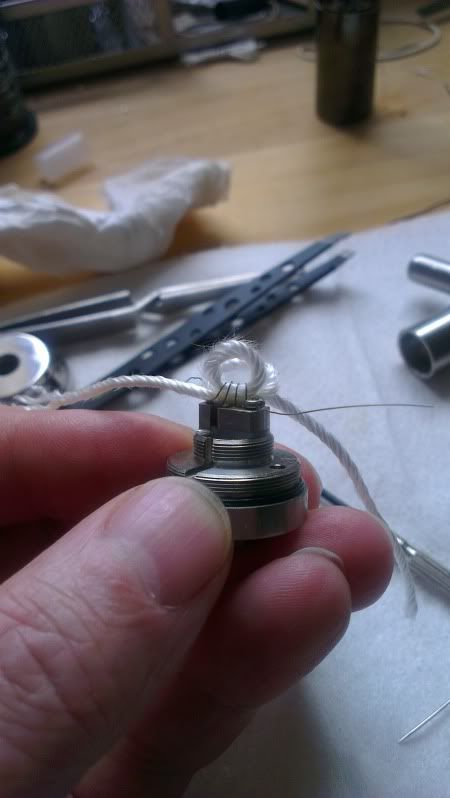 If you notice, when you bend down a loop into the base it barely touches the bottom- this prevents the channels on the base from becoming blocked by the wick and allows for a good well of juice to sit around the wick.  Trim the wires and trim the wick ends and adjust your coil with a small implement so that it sits raised about 1mm above the air hole in the base like this 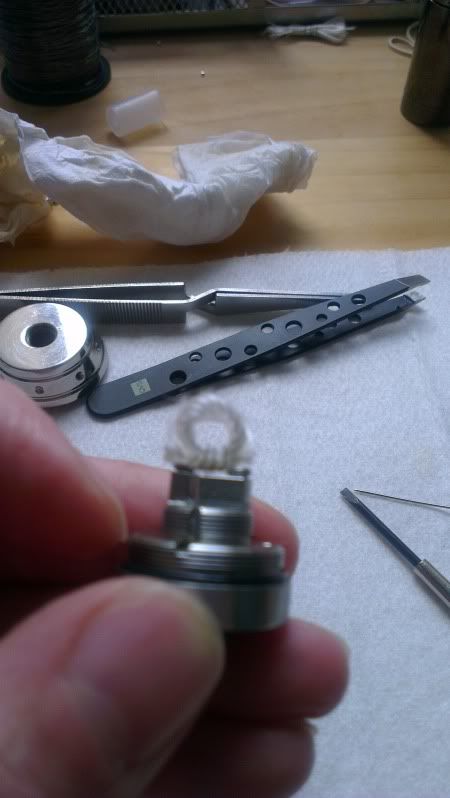 Screw on the bottom section of the chimney and you should end up with this, if both loops aren't down in the base then gently poke them down with a suitable implement Do not force them down hard just poke them so that they rest down the sides. 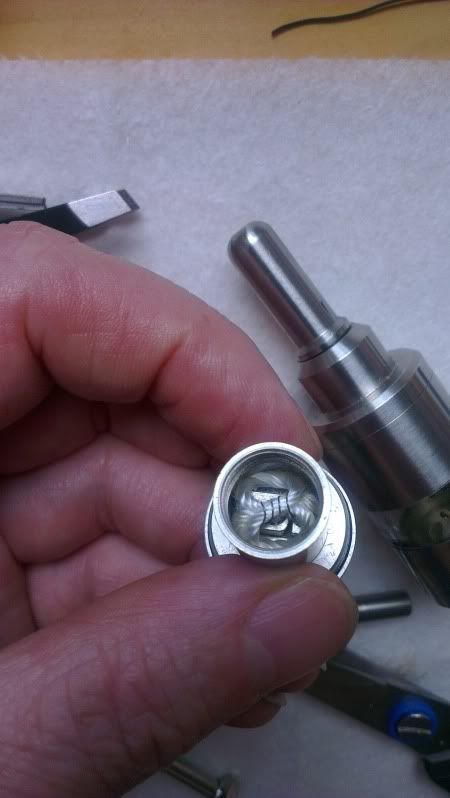 That's it done, put some juice onto your wick- test your ohms now and then put the chimney top section on, screw down and test the ohms again. The reading should remain the same. If it has changed dramatically then its likely that the coil has been pushed down onto the base and is shorting, if so then it's easy to put right from here - just remove the chimney and reset the coil. After trying many set ups on this attie this is the one that I have found works best for me. Hope it helps someone  |
|
dave
Super Member
    
Joined:November 2011
Posts: 3,074 
Location:
Likes: 833
Recent Posts
Last Online Dec 15, 2021 10:10:12 GMT
|
Post by dave on Aug 5, 2013 13:30:57 GMT
I just use 2mm Ekowool folded twice so there are three layers of it. I've got loads of Nichrome so I use that - 4/5 winds of 0.16 (about the same as 0.18 Kanthal) gives somewhere around 2 ohms, so I mainly use 0.2 Nichrome (similar to 0.22 Kanthal) and get around 1.7 ohms with that. I cut back the two looped bits and just leave two legs to go down to the juice channel. This is very simple and works well for me  |
|
dave
Super Member
    
Joined:November 2011
Posts: 3,074 
Location:
Likes: 833
Recent Posts
Last Online Dec 15, 2021 10:10:12 GMT
|
Post by dave on Aug 5, 2013 15:39:39 GMT
Just re-wicked mine so took a couple of pictures. This is after winding the coil (3 x 2mm Ekowool and 0.20 Nichrome, giving 1.7 ohms)) and attaching: 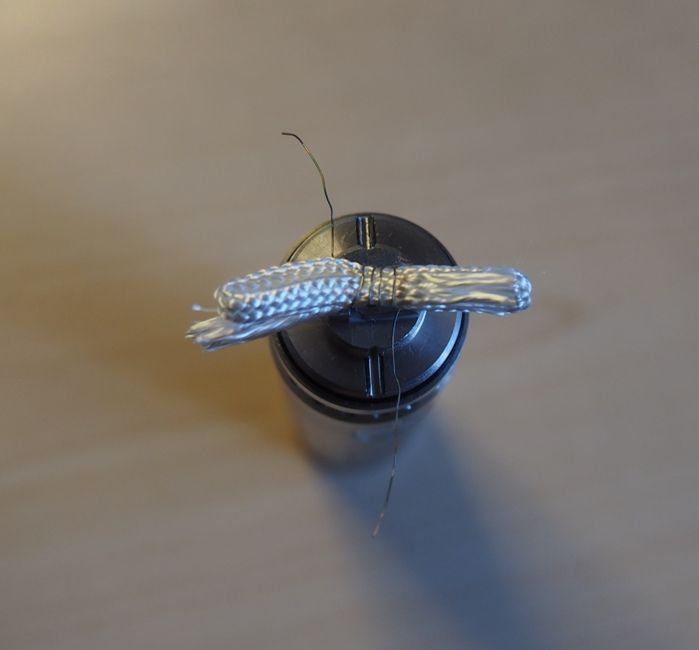 You can see the loop and the leg on the left (the other side is the same reversed), so I trimmed the wire and clipped off the loop on each side (with just a bit left on either side of the coil) leaving the legs to go down into the well. This one is not very clear, but it is after putting the chimney on. You can just see the nearside leg. 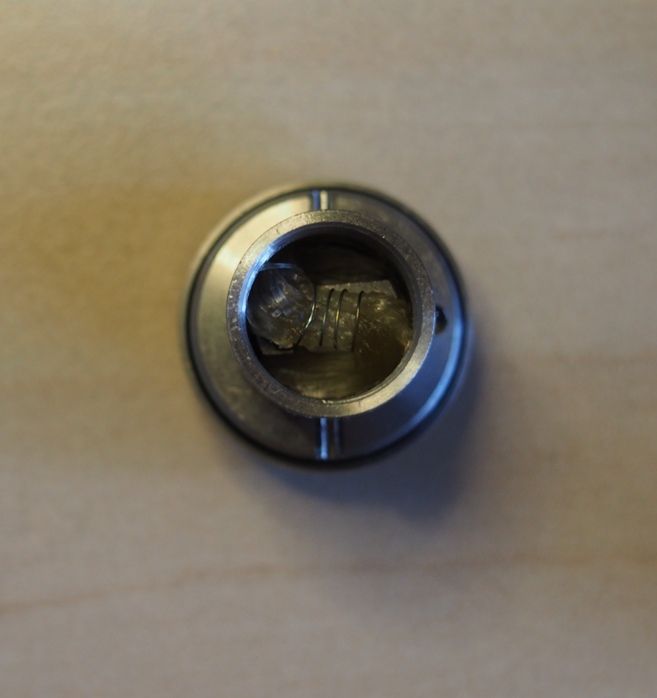 There are umpteen variations of this process but I think the key things are that you want plenty of wick in the coil and not much in the well. The other thing is to give it a really good dry burn before use to get rid of the initial funky taste. |
|
|
|
Post by Perpetua on Aug 5, 2013 16:05:43 GMT
I don't have a Kayfun, nor do I intend getting one . . . but just wanted to say, those are great visual tutorials blakey and dave, sometimes it's a heck of a lot easier to see the process in a series of photo's rather than in a video. Thank you for posting them.  Super-Shiny Super-Shiny, could I suggest moving your thread to the Modders/Rebuildable Board now, so it doesn't get lost in the other discussions is my thinking.  |
|
Greigster
Mod Maker
Provari Pimper
Joined:November 2012
Posts: 4,311 
Location:
Likes: 3,225
Recent Posts
Last Online Jul 11, 2024 8:49:03 GMT
|
Post by Greigster on Aug 5, 2013 18:11:21 GMT
Wow this thread has grown! Here is a couple of piccies of my Kayfun 3.1 just re-wicked and coiled using a Microcoil and a tiny piece of cotton wool. 11 turns of .30 Kanthal giving 1.6ohm and vaping great. The first photo is not showing vapour but just a fold in the material below the Kayfun    |
|
jonn
Full Member
   Dum spiro, spero..... While I breathe, I hope
Joined:September 2012
Posts: 242 
Location:
Likes: 115
Recent Posts
Last Online Sept 20, 2018 20:12:06 GMT
|
Post by jonn on Aug 5, 2013 18:32:28 GMT
Excellent guides/pics gents!  |
|
Super-Shiny
Super Member
     SUSPENDED
Joined:January 2013
Posts: 13,131 
Location:
Likes: 10,308
Recent Posts
Last Online Nov 25, 2014 19:31:22 GMT
|
Post by Super-Shiny on Aug 5, 2013 19:12:33 GMT
Dan results in....... I tried Version 1: ClickyDidn't get along with it too well  I tried version 2: ClickyWorked very well but quite a bit of effort (I am lazy when it comes to more work  ) Tried blakey version, very similar to version 2 and works very well  Tried Greigster version and this one for me was the easiest, it was fiddly at first like most versions but found a routine and it worked well and once i found that routine it was dead easy, same vape and everything that version 2 and blakey has to offer, not had one single dry hit and i don't chain vape so i thought i would try to see how it goes and the Kayfun stormed though it like a trooper  Also tried dave version and is pretty much the same as Greigster so also a  The only mistake i made and i don't know how it happened (Maybe to much juice or something to do with pressure) was my juice leaked out of the air hole a bit, i filled from the top, don't know if that is a bad idea but the instructions says it can be done? Just for info if filling from the bottom how many ml's should i fill? Overall OMG it's a cracking device and the vape/flavor is out of this world, i don't think i need to mention the quality of the thing but i will, simply outstanding engineering  And to top it off it looks outstanding on my SVD in 18650 mode and even better in 18350 mode (Ain't tried it on my eVic yet) Many thanks all for your help and piccys, much appreciated   
|
|
Greigster
Mod Maker
Provari Pimper
Joined:November 2012
Posts: 4,311 
Location:
Likes: 3,225
Recent Posts
Last Online Jul 11, 2024 8:49:03 GMT
|
Post by Greigster on Aug 5, 2013 19:40:44 GMT
Super-ShinyWhen filling from the top, you need to put your finger over the airhole and when you screw the top on, just get it on about 1/2 a thread and tip upside down. The juice should drop quickly to the drip tip end. As soon as the juice has uncovered the juice channels, screw the top on quickly. The whole thing from tipping it upside down to competly screwed on top should be done in one quick action.....perhaps 1.5 seconds and just keep some kitchen roll in the palm of the hand that is doing the screwing as you can still get a little juice out of the drip tip. I dont have the benefit of the bottom fill screw Rommers, why did you fill from the top? By filling through the base fill hole with the attie upside down, the juice channels are clear of juice and there is no increase of internal pressure that you get when screwing on the top cap. When filling from the bottom, just make sure you leave an air bubble at the top of your liquid....perhaps 5mm. air space
|
|
Super-Shiny
Super Member
     SUSPENDED
Joined:January 2013
Posts: 13,131 
Location:
Likes: 10,308
Recent Posts
Last Online Nov 25, 2014 19:31:22 GMT
|
Post by Super-Shiny on Aug 5, 2013 19:47:27 GMT
I dont have the benefit of the bottom fill screw Rommers, why did you fill from the top? By filling through the base fill hole with the attie upside down, the juice channels are clear of juice and there is no increase of internal pressure that you get when screwing on the top cap. I ain't got a clue why i filled from the top  but i won't be doing it again  Is there anything i should now about with filling it from the bottom...i.e pressure or tilting etc etc? also how many ml's do you think i should fill at? C9V say 4.2ml i think but filling from the top was about 4.0ml  |
|
Greigster
Mod Maker
Provari Pimper
Joined:November 2012
Posts: 4,311 
Location:
Likes: 3,225
Recent Posts
Last Online Jul 11, 2024 8:49:03 GMT
|
Post by Greigster on Aug 5, 2013 19:56:19 GMT
I must admit, I do not know the juice quantity even though both Kayfuns are the same amount. I just make sure I leave that 5mm. airspace.
I use full size clear tank on mine so it is a bit easier to see but you should be able to see your level as your bottom half of the tank is clear, unless you are using it in full SS mode, in which case you may have to measure it with a 5ml. syringe.
If you do get a little weep out of the air hole, just tightly twist the corner of some kitchen roll and poke it in, that will wick any excess out of there
|
|
Super-Shiny
Super Member
     SUSPENDED
Joined:January 2013
Posts: 13,131 
Location:
Likes: 10,308
Recent Posts
Last Online Nov 25, 2014 19:31:22 GMT
|
Post by Super-Shiny on Aug 5, 2013 19:59:54 GMT
Cheers GreigsterGotta say this thing gets better and better, it must be settling in or something, is there any end to how good this thing gets  Gotta feeling 16 x Evods 1 x Protank 1 x Iclear30 might be up on the classies very soon unless my OH gets her grubby hands on them  |
|
Greigster
Mod Maker
Provari Pimper
Joined:November 2012
Posts: 4,311 
Location:
Likes: 3,225
Recent Posts
Last Online Jul 11, 2024 8:49:03 GMT
|
Post by Greigster on Aug 5, 2013 20:31:45 GMT
ROFL3You need to be more worried she doesn't get her hands on yer kayfun  |
|