deesigner
Super Member
    
Joined:June 2010
Posts: 2,539
Location:
Likes: 884
Recent Posts
Last Online Apr 7, 2015 14:29:33 GMT
|
Post by deesigner on Jul 15, 2011 10:03:17 GMT
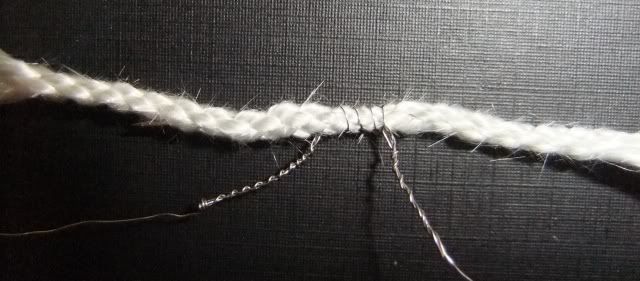
Firstly cut around 8 - 9 cm of your wick  You will need a pin or needle, a pin may be easier has eventually you will need to remove it.  Insert the pin inside the wick so that the pin is inside the wick centrally   Pull the wick across the pin so that it is fairly stiff, you want to have it as straight as you can get it. Visually find the central point of the wick, then take your wire and hold it against it. Start to wrap the flat single thin wire around the wick  You need to wrap this in tight coils which are close together but not actually touching each other, )this is why it's important to have the wick straight as on my first attempt the wick was wrinkled so when I put it in the ceramic and took the pin out the coils were touching.) you will end up with something that looks like this.  Keep the pin in place as you'll need this to help get the coils inside the ceramic on your Iatty. |
|
|
|
Post by Perpetua on Jul 15, 2011 11:37:40 GMT
This is such a valuable resource Dee, I've moved it to here, so as it doesn't get lost. Thank you so much for the time this must have taken you to do.  |
|
ian
Super Member
    
Joined:November 2010
Posts: 3,588
Location:
Likes: 191
Recent Posts
Last Online Jun 11, 2017 21:44:18 GMT
|
Post by ian on Jul 15, 2011 14:09:35 GMT
Great stuff Dee,this will help alot of people out for sure.Good for people to see a step by step with pictures.  |
|
deesigner
Super Member
    
Joined:June 2010
Posts: 2,539
Location:
Likes: 884
Recent Posts
Last Online Apr 7, 2015 14:29:33 GMT
|
Post by deesigner on Jul 15, 2011 15:08:18 GMT
This is such a valuable resource Dee, I've moved it to here, so as it doesn't get lost. Thank you so much for the time this must have taken you to do.  To be totally honest it didn't take much time at all and I had to make another coil up for myself. Getting the photo's right took longest as I had to keep retaking them. I really enjoyed doing it  |
|
camperman
VENDOR
Joined:February 2011
Posts: 1,114
Location:
Likes: 5
Recent Posts
Last Online Mar 1, 2022 16:49:35 GMT
|
Post by camperman on Jul 16, 2011 14:12:52 GMT
excellent dee thank you
i bought 2 of these whch came earlier in the week but i hadnt had time to do them so have left them untill now to have a bash at it and they have worked out pretty good, i just have to get the iattys built up now to put the wire/wick in them ;-)
|
|
deesigner
Super Member
    
Joined:June 2010
Posts: 2,539
Location:
Likes: 884
Recent Posts
Last Online Apr 7, 2015 14:29:33 GMT
|
Post by deesigner on Jul 16, 2011 21:38:35 GMT
Glad you got them done OK Mark, just make sure to tighten the plastic bits up pretty well and when you fit the coil wire make sure it's up against the top and can't affect the plastic when it screws together. I'm pretty sure that it's fixing the coil wires that's causing a lot of the leaking  |
|
camperman
VENDOR
Joined:February 2011
Posts: 1,114
Location:
Likes: 5
Recent Posts
Last Online Mar 1, 2022 16:49:35 GMT
|
Post by camperman on Jul 17, 2011 8:37:40 GMT
used it all last nite dee and couldnt belive how good it is
the only issue i had putting it together was both O rings for the ceramic were different sizes but on imeos video it shows them both the same size so i had to use an O ring from the second kit i bought.
ive actually posted about this elsewhere on the forum so i dont want to spoil the thread here going into to much detail
|
|
deesigner
Super Member
    
Joined:June 2010
Posts: 2,539
Location:
Likes: 884
Recent Posts
Last Online Apr 7, 2015 14:29:33 GMT
|
Post by deesigner on Jul 17, 2011 9:27:36 GMT
For some strange reason he'd decided it would be easier to get the ceramic cup in by using a smaller O ring first! I did manage to get the tiny O ring on but it split after a few hours use. I'm using one I had to file down from my cheapy O ring set.
|
|