VapingBad
Mod Maker
Mr Fix-it
Joined:January 2014
Posts: 13,800 
Location:
Likes: 14,176
Recent Posts
Last Online Oct 6, 2024 16:13:51 GMT
|
Post by VapingBad on Aug 2, 2015 20:41:44 GMT
So being impatient and short on time I decided not to make the box from stretch this time, but to use a Hammond 1590A case after seeing what a stunning job @scobby did with one on his Eclipse DNA40. They are quite small and after the brush finish it was 92.57 x 38.0 x 31.85 mm. The DNA200 is very compact and the main limit on the size of box is the height of the USB socket (6.7 mm) and I designed for that to be flush wit the outside of the box so the board and mountings only take up 10.3 mm inside the box if you mount the balance plug on wires. So I made spacers 5.25 mm long for a finished case thickness of 1.5 mm. From this it is easy to work out the lengths of the button and cut them from 5 mm shelf pins and polish with Autosol. The other considerations for space are the battery connectors which need about 7 mm and the bottom of the 510 making the VariTube a nobrainer as they are shorter that the completion with no bits that may dent the battery after a knock. 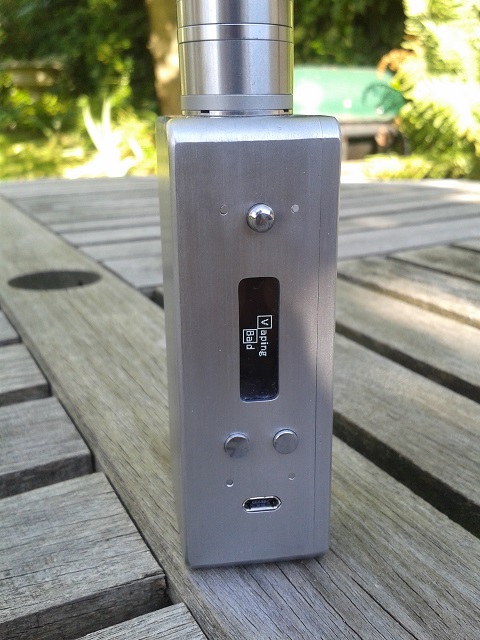 What is the DNA200 like to build with? What is the DNA200 like to build with?These are easy boards to use if you are reasonably good with a soldering iron, if not get some 14 AWG wire and old circuit board and practice practice practice. The board is capable of 250 W output so treat it with respect like you would with mains power wiring and be very very careful if you are soldering the battery permanently to the board, only have one wire stripped at a time and if it is going into a metal case mount the board first. You need to be careful with your soldering and mounting as a few people have gone wrong here, especially making solder bridges to vias (holes through the board that connect the layers), mounting the balance connector the wrong way round, not leaving enough clearance between the mounting points & 510 to the live parts of the board and letting the screen ribbon cable get caught by the fire button. Also if you use separate switches be careful one of the wires for the fire switch is at battery +ve voltage, I have not seen anyone come a cropper with that yet. 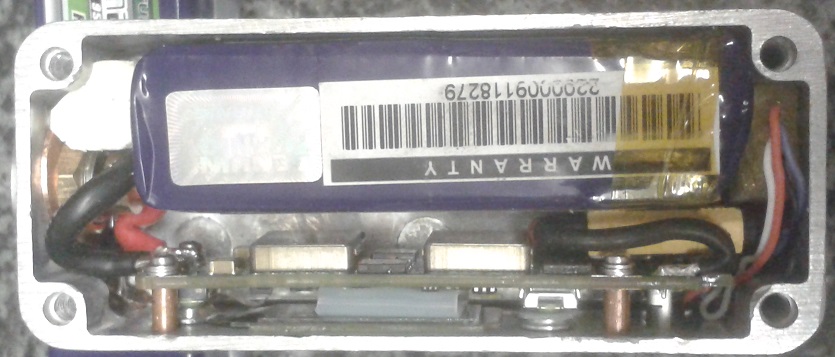 Parts used Parts usedI choose a Turnigy Nano-Tech 950 mAh 25C 3S 11.1 V battery, it only has just enough current rating and they are average quality, BTW you need to think in Watt hours for these and that is 10.545 Wh a Samsung 25R is 9 Wh. The connector the battery came with was not up to the job so I replaced it with a XT30 connector and cycled the battery on a hobby charger 3 times before connecting it to the board to check it was OK and break it in. The other off the shelf part was a VariTube 510 connector, which are the best easily to get connector ATM, I stretched the spring to increase the pressure, you could replace the spring with a stronger one. Qnd had to widen the connection hole (with a 2.5 mm drill IIRC) to fit 14 AWG silicon insulated wire with out stripping the insulation. The screen is held in place with a cut carto condom and has a layer of mobile phone screen protector on it, the guides for the screen are from a sheet of self-adhesive feet, the bit left after you use the feet. 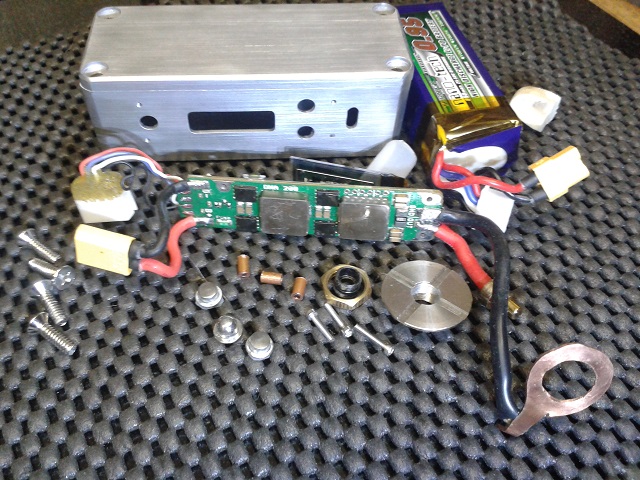 I use a Hammond 1590A box as I hate large mods, they are cheap and easy to work with, but ther are not square which has put me off them in the past. I had to grind down the inside corners, the lettering and one ridge from the lid to fit it all in. The final finish was done with 180 grit wet and dry paper and an Scotch-brite wheel on a Dremel. I made the buttons form 5 mm shelf pins (eBay or ModMaker have these), I made the ground ring from some old 3/4" copper pipe (thicker than the modern stuff) by spiting it, flattening it them drilling and cutting it out. I made the mounting spacers from some old copper micro-bore water pipe I had knocking about, cut roughly to 5.5 mm than ground down to 5.25 mm. I used M1.6 mm 10 mm socket head screws ground down to 8.6 mm plus a M2.5 mm washer to bolt the board to the case, the case holes were drilled @ 1.2 mm and then tapped with a M1.6 plug tap. 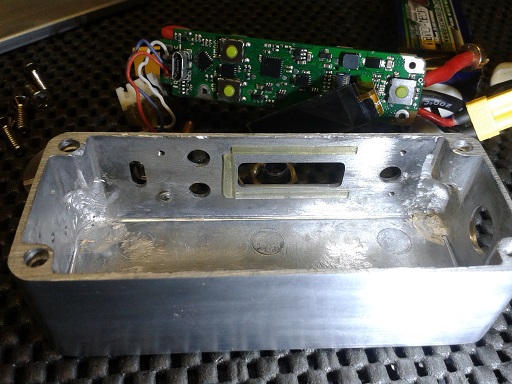 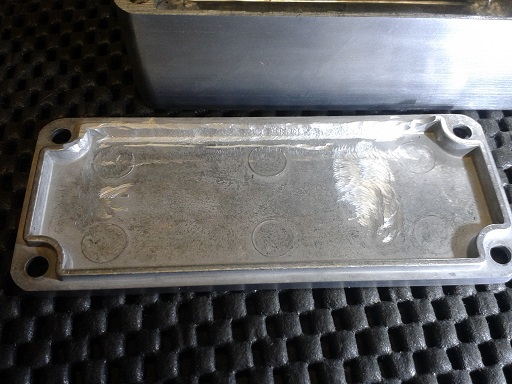 I used extra flexible (finer strands) silicon insulated wire through out, 14 AWG on the output, 18 AWG for the battery and 30 AWG for the battery balance connector. The heat shrink on the battery connector is the adhesive type. I recommend using heat shunts on the thick wires when soldering so not too much solder goes along the wire from capillary action to keep the flexibility and avoid strain Tools were just a Dremel, a cordless drill, a temp controlled solder station and needle files. Feel free to ask any questions and I will do my best to answer them. |
|
decoy
Super Member
    
Joined:February 2014
Posts: 4,119 
Location:
Likes: 3,118
Recent Posts
Last Online Apr 1, 2023 20:12:03 GMT
|
Post by decoy on Aug 2, 2015 20:59:37 GMT
how much
|
|
VapingBad
Mod Maker
Mr Fix-it
Joined:January 2014
Posts: 13,800 
Location:
Likes: 14,176
Recent Posts
Last Online Oct 6, 2024 16:13:51 GMT
|
Post by VapingBad on Aug 2, 2015 21:04:55 GMT
If you didn't have to buy any tools (I paid a tenner for a M1.6 tap, that hurt) probably about £85-90 ignoring the various P&P charges, but had to buy some bits in larger quantities and a hobby charger + PSU to check the batteries out and run a few cycles to condition them so I probably spent more like £140. |
|
xs2man
Super Member
    
Joined:July 2013
Posts: 1,256 
Location:
Likes: 760
Recent Posts
Last Online Nov 28, 2018 18:40:20 GMT
|
Post by xs2man on Aug 3, 2015 0:23:43 GMT
Now that is a beautiful little mod there. Would love something like that.
|
|
chrisintheuk
Senior Member
   
Joined:March 2014
Posts: 379 
Location:
Likes: 279
Recent Posts
Last Online Feb 23, 2018 16:14:18 GMT
|
Post by chrisintheuk on Aug 3, 2015 20:32:04 GMT
Sexy little thing that , I want one now
|
|
decoy
Super Member
    
Joined:February 2014
Posts: 4,119 
Location:
Likes: 3,118
Recent Posts
Last Online Apr 1, 2023 20:12:03 GMT
|
Post by decoy on Aug 3, 2015 21:32:56 GMT
If you didn't have to buy any tools (I paid a tenner for a M1.6 tap, that hurt) probably about £85-90 ignoring the various P&P charges, but had to buy some bits in larger quantities and a hobby charger + PSU to check the batteries out and run a few cycles to condition them so I probably spent more like £140.  i meant did you want for it tiss a rather nice build |
|
markm
VENDOR
Joined:March 2013
Posts: 1,942 
Location:
Likes: 1,762
Recent Posts
Last Online Feb 10, 2020 19:35:33 GMT
|
Post by markm on Aug 9, 2015 23:04:33 GMT
Very nice, I cobbled this together the other day, sadly the screen went pht, so when a replacement Arrives It's all going to be transplanted into a wood box.  |
|
VapingBad
Mod Maker
Mr Fix-it
Joined:January 2014
Posts: 13,800 
Location:
Likes: 14,176
Recent Posts
Last Online Oct 6, 2024 16:13:51 GMT
|
Post by VapingBad on Aug 10, 2015 18:18:43 GMT
Yea you have to make sure the ribbon doesn't catch in the fire switch, lots of the first few days if the Hana's had that.
|
|
beedee
Super Member
    
Joined:July 2015
Posts: 1,705 
Location:
Likes: 1,889
Recent Posts
Last Online Sept 11, 2024 12:54:56 GMT
|
Post by beedee on Aug 16, 2015 21:13:24 GMT
A thing of beauty and skill!  |
|