|
|
Post by Batdragon (AKA Batty) on Jun 12, 2012 16:26:10 GMT
Funny really is that I am a bit concerned about the weight of it. Its not going to be light by any means, so I might have to substiture some of the metal parts for plastic, which I am not really wanting to do.
|
|
|
|
Post by Batdragon (AKA Batty) on Jun 15, 2012 19:07:18 GMT
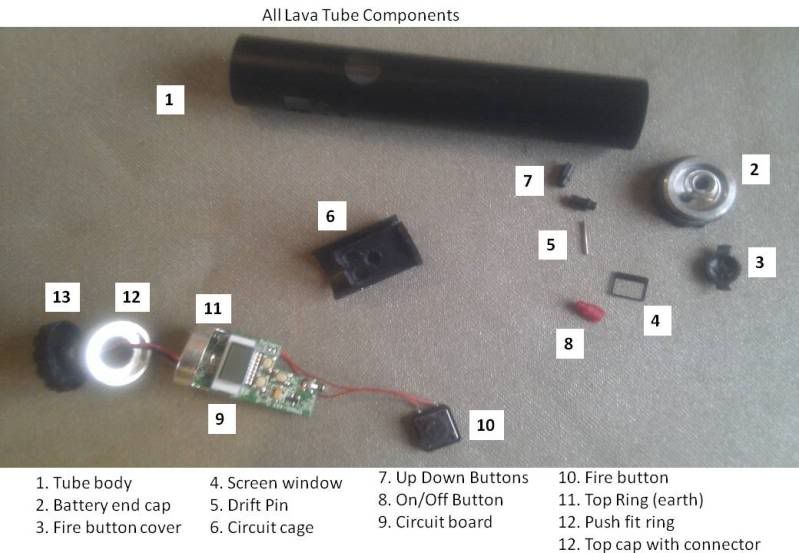
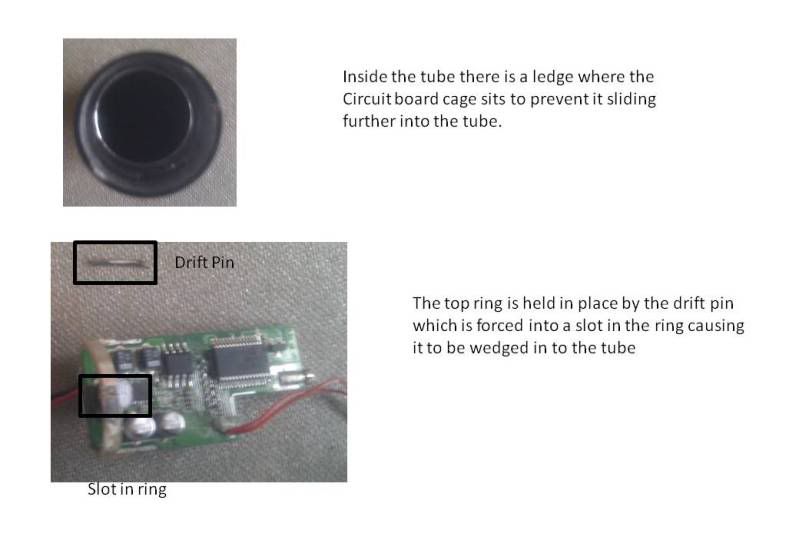
Ok here goes with the LT take down lol 1. Unscrew the battery end and remove battery if fitted 2. Prise off the other end cap. Mine came loose when I dropped it with a carto in it. It is only glued onto a metal ring inside. 3. With the cap off you will reveal a silver metal plug that is wedged into the end of the tube. Carefully with a screwdriver prise out the plug. Being careful not to catch the wires to the connector. Take your time with this, it is tightly fitted but will come out. Remember to move around the edge to ease it out as flat as possible otherwise it will start to twist and jam in. 4. I used a strong sewing needle that I snipped off the end to push the drift pin through the next ring. 5. With a pair of long nose pliers I eased the next ring out. It was difficult as it has a touch of solder holding it to the tube wall and the circuit board is very close. Remember not to put any pressure on the circuit board or it will damage it. 6. At the same time you will need to watch the push buttons for altering the voltage and the little red one as they will need to be pressed in while you are slowly pulling out the circuit board. I found it helped to have a long bar to push the cage out from the other end at the same time. If you look up the inside of the tube you will see that the fire button if not moving and will come out last 7. It is now a matter of gently sliding it all out with even force (but not too much as you will break something)   |
|
|
|
Post by domesticextremist on Jun 15, 2012 19:21:33 GMT
#icon_bravo#
|
|
|
|
Post by Batdragon (AKA Batty) on Jun 15, 2012 19:23:06 GMT
I just hope it is useful to others.  |
|
|
|
Post by domesticextremist on Jun 15, 2012 19:23:52 GMT
It would be useful to me , if I had a Lava Tube  |
|
|
|
Post by Batdragon (AKA Batty) on Jun 15, 2012 19:33:10 GMT
It would be useful to me , if I had a Lava Tube  Is it greedy that I have 3 (thought one is in bits) lol |
|
maccafan
Super Member
    
Joined:May 2012
Posts: 6,278
Location:
Likes: 469
Recent Posts
Last Online Nov 3, 2022 10:25:09 GMT
|
Post by maccafan on Jun 15, 2012 19:38:30 GMT
Nice piccys Batty.. Useful to know..  |
|
hissie
Super Member
    
Joined:July 2010
Posts: 4,601
Location:
Likes: 120
Recent Posts
Last Online Apr 22, 2021 20:41:37 GMT
|
Post by hissie on Jun 16, 2012 19:45:09 GMT
Why are you taking Lavatubes apart lol.
Mine was knocked off the table & the end cap came off. Also there is a slight showing of metal where the top cap is but it seems to be working ok. However, am I to expect it to break because of it?
|
|
maccafan
Super Member
    
Joined:May 2012
Posts: 6,278
Location:
Likes: 469
Recent Posts
Last Online Nov 3, 2022 10:25:09 GMT
|
Post by maccafan on Jun 16, 2012 20:09:13 GMT
... am I to expect it to break because of it? No.. The top plastic is pressed into metal tube. I think that's dislodged and exposed the tube underneath. You should be able to press it back in place. Put in on a even wooden surface, top down and press it back in by rocking it fro side to side whilst putting downward pressure. |
|
hissie
Super Member
    
Joined:July 2010
Posts: 4,601
Location:
Likes: 120
Recent Posts
Last Online Apr 22, 2021 20:41:37 GMT
|
Post by hissie on Jun 16, 2012 23:16:25 GMT
Thanks macca! That tip worked. Now to glue the end cap back on  |
|
|
|
Post by Batdragon (AKA Batty) on Jul 11, 2012 11:24:41 GMT
Functions:
LCD Display
'+'and '-' voltage controls to adjust voltage by 0.1v increments
On/Off button (press and hold for 5 seconds)
Discharge protection
Voltage regulator to ensure voltage remains at desired selection
For use with High Resistance Atomisers to produce increased vapour
Short Circuit protection
Quick Usage Guide:
Use '+' and '-' buttons to increase, decrease voltage.
Press both '+' and '-' buttons together until display flashes to lock/unlock your preferred voltage setting.
Hold power button for 5 seconds to turn off and on.
Press power button 7 times quickly to provide battery voltage, it is recommended to recharge when battery drops to 3.7v.
To determine load voltage, press power button 7 times, then press the fire button and power button simultaneously.
|
|
chrisjw
Super Member
     Master Ear Licker
Joined:May 2012
Posts: 8,378 
Location:
Likes: 5,594
Recent Posts
Last Online Jan 25, 2016 18:41:24 GMT
|
Post by chrisjw on Jul 11, 2012 12:31:09 GMT
Nicely done & very useful batty...............10/10.....................  |
|
garrydibley
VENDOR
Joined:October 2011
Posts: 291
Location:
Likes: 97
Recent Posts
Last Online Feb 27, 2022 18:20:42 GMT
|
Post by garrydibley on Jul 12, 2012 19:18:32 GMT
Nice thread.
I find some will fall apart some will need a nuke.
Once the body fails the internals can be quite useful, lol
A great pictorial of the breakdown.
|
|